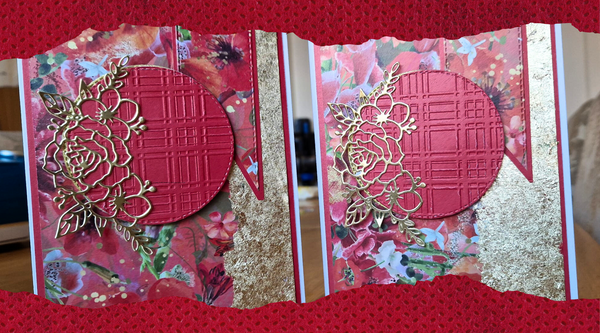
How to craft a card with Gemini Ornate Pop Out Dies
- Read time: 2 minutes
- Written by: Crafters
Open up your crafting potential to make a fun interactive card with Gemini Ornate Pop Out Dies!
Each set includes layered decorative elements to create a clever pop-out panel – the perfect setting for a sweet message, birthday wish or surprise announcement!
It’s so straightforward to craft something really special. Why not try it out yourself by following our easy step-by-step guide?

You will need:
- Gemini Ornate Pop Out Die – Majestic Damask
- Coloured card – three different colours
- Patterned paper
- Sentiment stamp
- Inkpad
- Crafter’s Companion Rock a Blocks
- Ribbon
- Embellishments
- Guillotine
- Scoreboard
- Scissors
- Crafter’s Companion Glue Tape Pen
Step-by-step instructions:

- Measure and cut a piece of card 11″ x 7″.

- Score down the long edge at 5.5″ and 2.75″.

- Fold and burnish the score lines to create a fold back card.

- Lay the outline Majestic Damask Ornate Pop Out Die over the top of the first score line matching up the notches on the top of the die to the score line on the card.

- Follow the instructions with your Gemini Die Cutting machine to die cut the shape. It will remain attached the top and the bottom.

- Take the outer Majestic Damask die and using the Gemini Machine die cut it into matching card stock. Snip the top and bottom pieces off creating a separate shape.
- Then using the next size of outline shape, die cut using a piece of contrasting card. Finally die cut the ornate die in card of a similar colour to the base card. Attach these pieces together.

- Cut patterned paper and contrasting card to fit onto each panel of your card base. Cut the card 1/4″ larger than the patterned paper to create a stepped frame effect. Attach together as shown.

- Take the two thinner panels and use low tack tape on the reverse to temporarily temp attach them together as shown.

- Line up the piece with the main panel of your card base and trace the die cut piece from the card panel onto the back of the two narrow pieces. Lay the outer frame on the outline as shown.

- Die cut using the Gemini machine to create decorative panels to fit around the pop out.

- Attach the die cut frame pieces and decorative panels to the front of the card.
- Die cut the innermost frame shape, add a sentiment and attach to the centre. Finish the card off with a ribbon bow and embellishments around the edges.
We can’t wait to see your finished makes! So, don’t forget to show us your Ornate Pop-Out creations on Facebook UK, Facebook USA, Twitter, Instagram UK, Instagram US, Pinterest UK or Pinterest US using the hashtag #crafterscompanion