3 Wedding Favour Box Ideas
- Read time: 6 minutes
- Written by: Crafter's Companion
Creating your own wedding favour boxes is a wonderful way to add a thoughtful, personal touch to your big day. Not only do handmade favours show your guests how much you appreciate them, but they also allow you to coordinate every detail with your wedding theme. Here are three favour box ideas that are easy to make and beautifully effective.
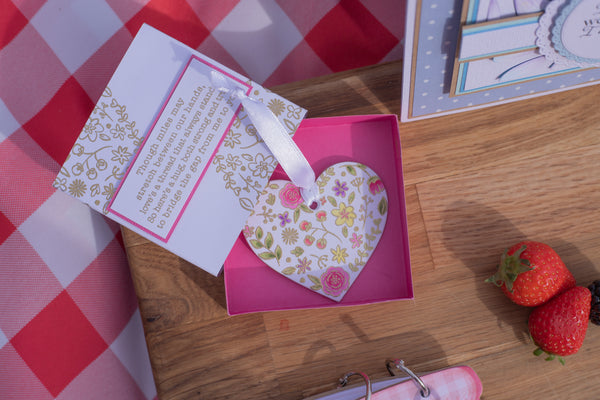
Love Heart Favour Box

What You’ll Need
-
-
-
-
- Ivory (or White Card) and Gold Card
- Red Liner Tape
- Bone Folder
- Metal Ruler
- Metallic Ink – Gold
- Embossing Powder
- Foam Pads
- Scissors
- Master Creator Score Board
- Guillotine
- Heat Tool
- Hot Glue Gun
- Ribbon (approx. 12”)
- Gemini Midi
- Love Hearts Stamps & Dies
-
-
-
Step 1: Create Your Box Base
Cut a piece of ivory or white cardstock to 8.5” x 4” using your guillotine.
Score along the short side at 1.75” and 3.5”, then rotate and score along the long side at 2”, 4”, 6”, and 8”.
Make small marks down to the first score line at 3” and 7” to guide your folds.
Using a metal ruler and bone folder, carefully score diagonal lines to create triangular folds at the top of the box. Burnish all score lines (except the triangles) to ensure crisp, clean edges.
Step 2: Cut and Assemble the Structure
Trim along the outer edges and base tabs to form your box shape.
Cut two gold cardstock mats measuring 1.78” x 1⅝”, and two ivory layers measuring 1.75” x 1.5”.
Layer and adhere these panels onto the front and back of your box for a polished, decorative finish.
Secure the sides of the box using red liner tape, then use tacky glue to assemble the base. Gently pinch the top so it folds neatly into shape.
Step 3: Add Ribbon Closure
Create two small holes at the top of the box and thread your ribbon through, tying a bow.
Step 4: Create the Heart Embellishments
Die-cut heart shapes from ivory cardstock.
Stamp the hearts with gold metallic ink, then heat emboss with gold embossing powder for a luxurious finish.
Die-cut additional hearts from gold cardstock to create a shadow layer behind your stamped designs.
Attach the layered hearts to the front of your box using foam pads for added dimension.
Step 5: Finish with a Statement Detail
Glue two hearts back-to-back and secure them to the top of the favour box using a hot glue gun.
This Love Heart favour box is a beautiful way to thank your guests while adding a personal, handcrafted detail to your wedding day.
Antique Lace Rub-On Wedding Favour Box

What You’ll Need
-
-
-
-
- Ivory Card
- Ribbon
- Hook & Loop Dot
- Stitched Edge Arches Die Set (second largest size approx. 3” x 4½”)
- Sara Signature Antique Lace Rub-On Pack
- Hot Glue Gun
- Tape Pen or Tacky Glue
- Scoreboard & Tool
- Paper Trimmer / Guillotine
-
-
-
Step 1: Create the Box Structure
Start with a 6” x 6” piece of ivory card.
Score at 1½” and 4½”, then rotate the card 90° and score at 2⅝” and 3⅜”.
Fold along the 1½” and 4½” score lines and burnish well. Then, line up the 2⅝” score line with the folded edge and burnish. Repeat on all 4 folds.
Step 2: Make the Decorative Flap
Cut a second piece of ivory card to 3½” x 5”.
Using the Stitched Edge Arches Die, cut the decorative flap shape. Trim this piece down to 2¼” wide, then score at approximately ⅞”–1” to create a tab for attaching to the box.
Step 3: Add Vintage Lace Detail
When you have all the pieces ready, use your rub-ons to decorate the outside.
Step 4: Assemble the Box
Adhere the flat tab of the flap to the back of the box using tacky glue or a tape pen. Ensure it’s aligned neatly so the flap folds smoothly over the front.
Step 5: Add the Finishing Touches
Tie a bow with your ribbon and attach it to the centre of the flap using a hot glue gun for a secure hold.
To close your favour box, add a hook & loop dot beneath the flap
Wildwood Whimsy Pillow Box

What You’ll Need
-
-
-
-
- Lightweight white cardstock
- Woodgrain Embossing Folder – Wildwood Whimsy Collection
- Ephemera Pack – Wildwood Whimsy
- Half pearls
- Gem
- Tacky glue
- Twine
- Circle punch
- Bone folder
- Red liner tape
- Oval nesting die or oval die-cut
- Scissors
-
-
-
Step 1: Cut and Score the Box Base
Cut one piece of lightweight white cardstock to 6" x 6".
Score at 2¾" and 5½", then fold and burnish the score lines well using a bone folder.
Step 2: Emboss the Decorative Panels
Cut two panel pieces measuring 2⅝" x 5⅞".
Emboss both panels using the Wildwood Whimsy Woodgrain Embossing Folder to add a beautiful textured finish.
Step 3: Attach the Panels
Adhere the embossed panels to the pillow box base, positioning them neatly between the score lines.
Add red liner tape to the narrow side tab.
Step 4: Shape the Pillow Box Ends
Use an oval nesting die or oval die-cut as a guide to draw a curved shape at the top and bottom of the pillow box.
Carefully cut away the outer curved sections with scissors.
Trim the side tab to follow the same curved shape, removing the corners so it lines up neatly with the shaped edges.
Step 5: Create the Closure
Using the oval guideline, gently score and shape each end inward to create the pillow box closure.
Use a small circle punch to create a finger notch on each end, making the box easier to open.
Step 6: Assemble the Box
Gently curve the box with a bone folder to help form the pillow shape.
Remove the backing from the red liner tape and attach the tab to assemble the box.
Step 7: Decorate Your Favour Box
Wrap twine around the box and tie it into a bow or knot.
Finish by decorating with pieces from the Wildwood Whimsy Ephemera Pack, die-cut foliage, and half pearls for a soft, elegant touch.