It may be still only August but there’s nothing wrong with being prepared for Christmas…after all it does have a habit of sneaking up on you!…so I’m going to share with you this unique and eye-catching little tutorial that DT member Pam Leng has created to get you making Christmas ornaments that will get everyone raving about!
You will need:

Glue
Scissors
Two pieces of ribbon, each piece about 18″ long
Paper clips or mini pegs
1 First of all cut out your tea bag squares, with the pattern side outer-most then fold in half diagonally to make a triangle.

PLEASE NOTE THAT AT ALL STAGES USE YOUR BONE FOLDER TO CREASE
2 Fold the outer corners into the centre, this should then form a square.

3 Fold the flaps back on themselves, along the outer edge of the square.

4 Open out the flaps so that they form a kite shape on each side.

5 Fold back the point of the kite shape so that it is level with the square.

6 Fold the outer edge of the kite in towards the centre.

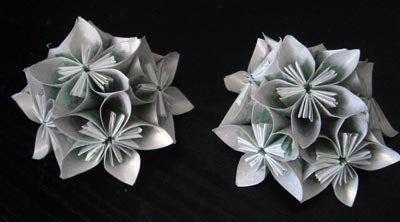
7 Fold the outer edges together and glue. At this stage I held together with either a paper clip or mini pegs. This forms one petal.

7 When these have dried, the ornament needs to be made in two halves. Firstly you need to glue five of the petals together to form a flower.
 This is how the back will look.

8 When the flowers have completely dried you need to adhere six together to make one half, one in the middle and five around the outside. You now need to make the second half the same as the first half.

9 The next step is to spray both halves with Spray and Sparkle.

10 Glue your two pieces of ribbon to the back of one half then when dry glue both halves together. You may need to use either your paper clips or mini pegs to hold in place until dry.
There you have it…just by following these simple steps you too can create stunning Christmas ornaments!