How to craft a Christmas snowflake
- Read time: 5 minutes
- Written by: Crafters
Christmas is a wonderful time of year for all abilities of crafter, there’s so much you can make yourself to decorate your home or give as gifts to friends and family. Why not have a go at crafting this frosty and delicate snowflake decoration?
This step-by-step guide to crafting a Christmas snowflake is great for every type of maker. If you’re just starting out, simply follow the cutting and folding technique to build a stunning snowflake from paper. And if you’re a more experienced crafter, there are die-cutting and stamping elements to give your snowflake some extra intricacy.
We’ve used the frosty and fabulous Sara Signature Winter’s Sparkle Collection for this project. And, you can even make your snowflake shine even brighter by adding LED lights if you like! The sky’s the limit with this Christmas crafting guide…

You will need:
- Sara Signature Winter’s Sparkle:
- Red Liner Tape
- Hot Glue Gun
- Wet glue or spray adhesive
- Quick Dry Inkpad & festive sentiment stamp
- Guillotine
- Gemini Die Cutting Machine
- Scoreboard
- Craft Knife
- Ruler
- Stamping Platform or Rock-a-Block
- LED lights (optional)
Step-by-step instructions:

- Take two pieces of 12” paper from the paper pad. Cut the papers in half both vertically and horizontally creating eight 6” squares.

- Take one of the pieces of paper and fold it corner to corner creating a triangle shape. Lay this on your mat with diagonal furthest away from you.

- Starting ¾” from the diagonal line, cut a line all the way down at ½” intervals stopping at 4.5” mark.

- This should leave you with 10 strips connected at the top as shown.

- Open back out to a square. Starting at the tip, curl round the two sides and attach them together using a strong adhesive such as red liner tape. If you find they don’t reach try rolling the edges around something like a pencil to create a natural curve.

- Turn the paper over so that your new loop is face down and repeat previous step on the next two strips.

- Continue the process, flipping the paper over to alternate sides each time, until you get all the way to the bottom.
- Once complete repeat with the other five paper squares creating six in total.

- Take two of the sections and attach them together at the bottom continue attaching until all six are attached together.

- Where the sections touch further up attach them together with a little hot glue. Once all six sections have been connected this should give you the base snowflake shape as shown.

- Take the Majestic Snowflake die and use with your Gemini die cutting machine to die cut three pieces from white linen card.

- Take each piece and cut the long thin rectangle from each of the pieces just leaving the snowflake branches as shown.

- Take two of the die cut pieces and line up two of the branches over the top of each other and the using a wet glue attach to together creating a 5-point snowflake.
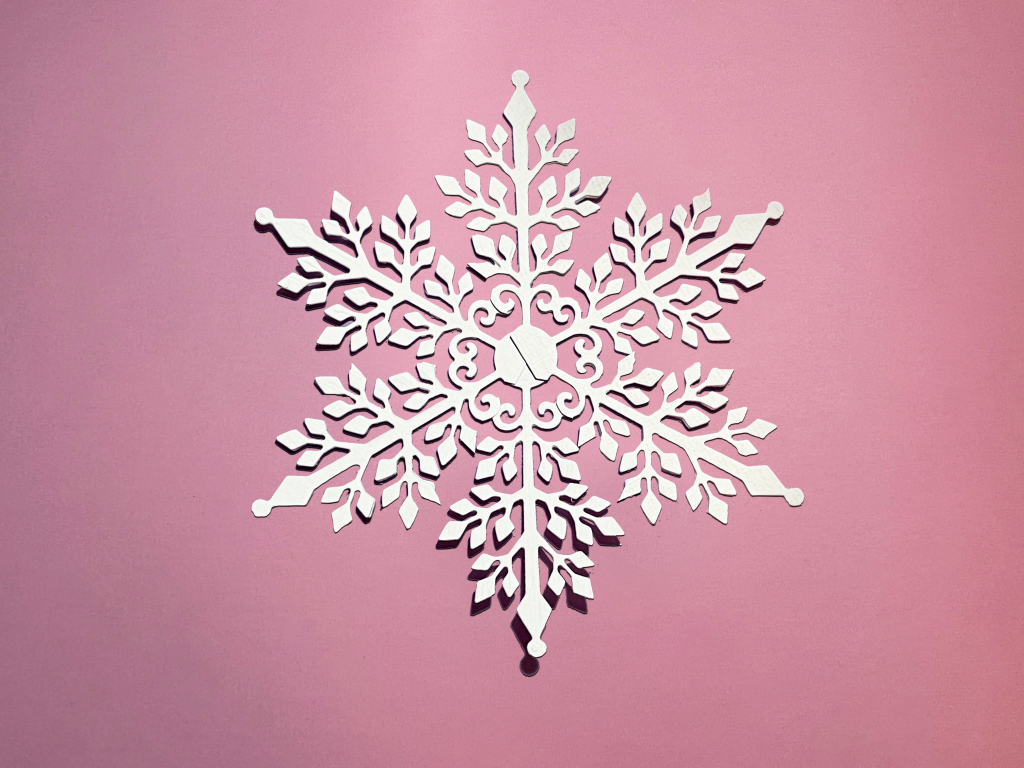
- Take the last die-cut snowflake and line up the two end branches with the 5-sided snowflake and using a wet glue attach creating a 6-pointed snowflake.

- Use a spray adhesive or wet glue and coat one of the side of the snowflake and then cover in the chunky glitter. Set aside.

- Take the Winter Flurry die and , cut the following:
- Three large snowflakes from white linen card.
- Three large snowflakes from light blue linen card.
- Six medium snowflake from mid- blue linencard.

- Take the six large white and light blue snowflakes and arrange in a circle on the base snowflake with each snowflake lined up with the tip of each branch as shown.

- Add the medium snowflakes in between the large snowflakes (these should help to cover the glue spots).

- Attach the large, glittered snowflake on top of the ring of the snowflakes. At this point you could turn the snowflake over and thread some LED lights through the branches

- Take a piece of ribbon and attach to the top of one of the branches

- Stamp a festive sentiment ( if you want to use the Winter’s Sparkle Collection there are sentiments in the Majestic Snowflake or Winter Holiday sets). Layer onto a slightly larger piece of black card.

- Use hot glue or 3D glue to attach the sentiment to the centre of the snowflake

- Add some shimmer spray to the tips of the outer edges of the snowflake.

We can’t wait to see your finished makes! So, don’t forget to show us your Christmas craft creations on Facebook UK, Facebook USA, Twitter, Instagram UK, Instagram US, Pinterest UK or Pinterest US using the hashtag #crafterscompanion