Stamping for beginners - cardmaking project
- Read time: 3 minutes
- Written by: Crafters
If you're new to craft and cardmaking, stamping is a great way to get creative and make simple but show stopping cards. Stamping is easy to master and produces great results quickly - perfect for beginners!
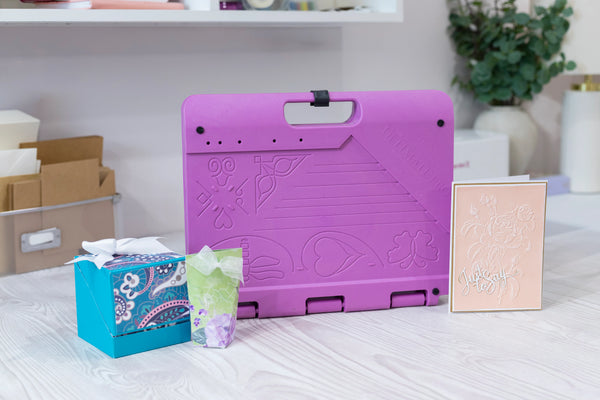
Follow our step-by-step instructions to learn simple stamping technique. We've used Crafter's Companion Rock-a-Blocks, a stamping tool that applies even pressure to reveal pristine, smudge-free designs. Our guide also shows you how to turn your stamped centrepiece into a finished card!

You will need:
- A blank card - we used Violet Studio Pastels 6" x 6" Card Blanks
- Patterned paper
- Coloured card
- Stamping card
- Clear acrylic or photopolymer stamp - we used the Crafter's Companion Make You Happy stamp
- Crafter's Companion Rock-a-Blocks
- Spectrum Noir Harmony Quick Dry Inkpad - Crushed Velvet
- Decorations
- Guillotine
- Adhesive foam pads or glue
Step-by-step instructions:
Building the card base:
- Measure your card blank, the one we're using measures 6" x 6".
- Take a piece of coloured card and use a guillotine to cut it to 5 3/4" x 5 3/4". (If you're using a different size of card blank, cut your coloured card so it is 1/4" smaller on all four sides.)
- Next, take a sheet of patterned paper and cut it to 5 1/2" x 5 1/2".
- Now, take another sheet of coloured card (in the same shade) and cut it to measure 5 1/4" x 5 1/4".

5. Layer the card and paper squares on top of the card blank. Go from largest to smallest and centre each piece to create a matt and layered effect.
6. Once you're happy with your arrangement, use a glue tape pen or foam pads to stick down each piece. Foam pads will raise each later to create a 3D effect.


Simple stamping technique:

- First of all, take your stamp and lay it onto your Rock-a-Block. It should cling easily, but if it's sliding you can spritz some Stick and Spray Mounting Adhesive onto the block.

2. Take your inkpad and apply ink to the stamp. Dab it on to make sure the full design is covered.
3. Take a sheet of white stamping card. Pick up your stamping block and bring it to the card. Rest the bottom edge down onto your card and rock the block from heel to toe onto your card.
4. Carefully raise the Rock a Block off the card to to reveal your finished design.


5. Cut around your stamped design to create a square centrepiece.

6. Arrange your stamped centrepiece onto your card and secure in place with foam pads or a glue tape pen.

7. Add your chosen decorations to finish. We've used stick-on pearls for an elegant touch.
Now you've mastered the foundations of stamping, why not try different styles and colours to create cards for every occasion. The Crafter's Companion blog has so much more stamping inspiration for you to explore!
And, don’t forget, we love to see your finished makes! So, make sure to show us your finished creations on Facebook UK, Facebook USA, Twitter, Instagram UK, Instagram US, Pinterest UK or Pinterest US using the hashtag #crafterscompanion