Die cut a beautiful birthday card - a step-by-step guide
- Read time: 3 minutes
- Written by: Crafters
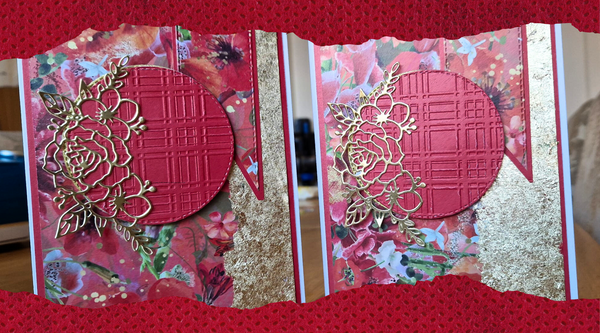
Make someone's day with a homemade, hand-crafted birthday card! This project features stunning die-cut details to give a professional finish to your makes.
And the best part? Anyone can make it! This easy-to-follow guide includes step-by-step instructions with imagery. Ideal if you're a bit of a beginner looking to try out cardmaking and die cutting.
So get ready to craft along and make your own showstopping birthday cards!

You will need:
- 12" x 12" Everyday Celebrations Patterned Paper Pad
- Crafter's Companion Textured Card in shades of pink and purple
- Birthday Wishes Sentiment Die
- Collal Tacky Glue or a Crafter's Companion Glue Tape Pen
- White Card
- Foam Pads or 3D Glue Gel
- Ribbon
- Scissors or a Guillotine
- Gemini Die Cutting Machine
- Inkpad in a dark shade for your sentiment
- Rock-a-Blocks or a Stamping Platform
You can use any design of patterned paper and any shade of coloured card to fit your theme or recipient!
Step-by-step instructions:

- Cut out your card base. Take an A4 sheet of White Card and cut vertically down the middle then fold in the centre.

- Position the outer frame of your metal die in the centre of card front, attach using low tack tape. Pass through your Gemini die cutting machine, following the included instructions to create the correct plate combination.

- Trim a piece of coloured cardstock so that it is roughly a quarter of an inch smaller than your card base. Trim a piece of patterned paper so that it is a quarter of an inch smaller than your coloured card. This will create a layered effect known as matting. Repeat the previous process to die cut the outer frame into both pieces.

- Place the outer frame onto a piece of coloured cardstock and pass through your Gemini machine to die cut a solid oval shape.

- Choose a piece of card in a contrasting colour. Arrange both the outer frame and inner sentiment die and pass through your Gemini machine to cut out a beautiful framed sentiment.

- Stick your framed sentiment onto the solid oval piece.

- Trim a piece of patterned paper to sit on the inside of your card, leaving small border around the outside. Stick down.

- Arrange your sentiment piece into the middle of the card interior so that it shows through the frame cut into the card front. Adhere using foam pads or 3D glue gel.

- Stamp the 'From me to You' sentiment onto a piece of white card using a dark inkpad. You can use Rock-a-Blocks or a Stamping Platform for fast, accurate and smudge-free results.
- Trim your card with the stamped sentiment into whichever shape you'd like. Cut a piece of coloured card so it is slightly larger, stick the sentiment piece on top to create a coloured frame.

- Tie a piece of ribbon into a bow, trim off the ends and attach to your card for the perfect finishing touch!
You’re all done! Time to write a sweet message to your recipient and pop your homemade card into an envelope -ready to hand over on the big day! And now that you’ve mastered the basics of cardmaking and die cutting the world is your oyster`! Experiment with different dies, designs and effects to create cards for every occasion.

We can’t wait to see your die cutting and card makes! So, make sure you share your project photos with us on Facebook UK, Facebook USA, Twitter, Instagram UK, Instagram US, Pinterest UK or Pinterest US using the hashtag #crafterscompanion