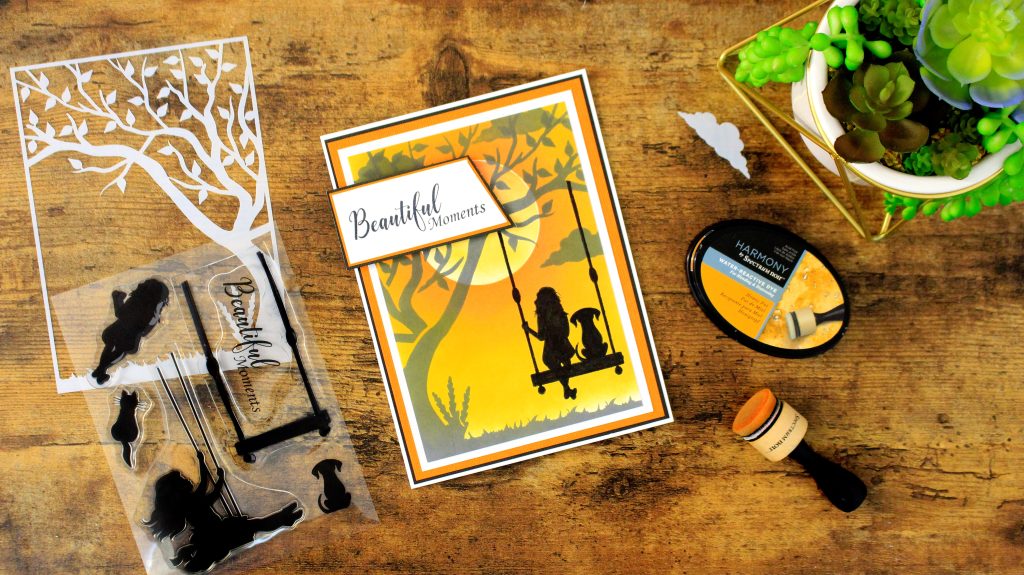
Stamp and colour a silhouette stencil card
- Read time: 3 minutes
- Written by: Crafter's Companion
Looking for a technique that makes your designs really stand out? With just a stamp and a stencil, you can create an array of different designs including a stunning silhouette that both stands out and fades into the background.
Get started today with our guide below!
You will need:
- Crafter’s Companion Beautiful Moments Stencils and Silhouette Stamp Set (alternatively, you can use any clear stamp and stencil)
- Stamping Mat
- White multi-purpose card
- Black multi-purpose card
- Coloured multi-purpose card (we’ve used orange)
- Craft tape
- Spectrum Noir Water-Reactive Ink Pads (we’ve used shades Honey Pot, Orange, Chinese Red and Black)
- Spectrum Noir Blending Tool
- Guillotine
- Crafter’s Companion Stamping Platform
- Crafter’s Companion Tape Pen
- Crafter’s Companion Pokey Tool
Getting started
1. Take a piece of white multi-purpose card measuring 6 x 9” and secure it in place on your stamping mat with craft tape.
2. Take the inner circle stencil, placing it just above the middle of your card. With your blending tool, apply the ink from your ‘Chinese Red’ ink pad. Dab this around your circle, creating a halo-like effect.
3. Repeat the process again using the ‘Orange’ and the ‘Honey Pot’ shades, going outwards each time until the entirety of your card is coloured.
4. Take the outer circle stencil now, and place this over the white circle that is left on your card. Using the excess ink left on your blending tools, dab this onto the circle, creating an ombre effect with the 3 colours. Remove this stencil.
5. Take the branch stencil from the set, and place this over the sun, so it’s covering most of the left side of your card. Secure this in place with your tape and grab another blending tool and your black ink pad.
6. Cover the entire stencil with your black ink, using your blending tool in a dabbing motion to allow full coverage. (Don’t worry if you get the ink outside of the stencil – you’ll be trimming this later!)
7. Repeat this process with the remaining stamps from the pack, leaving black clouds and a silhouette of a girl on a swing. Use your pokey tool and remove the pieces of tape from your card and mat, so you’re left with just your card.
8. Trim the edges of your card with your guillotine so that you have a crisp and even edge on each side, and your image fits the entirety of your card.
9. Take a piece of A4 white multi-purpose card, a black piece just smaller and a coloured piece just smaller than that. With your white piece at the back, use your tape pen to stick the black card on top, and then stick the coloured piece at the very top.
10. Grab another 6 x 9” piece of white card. Adhere your final stamped image to the card using your tape pen, then glue that to the coloured card below.
Your card is now complete! Add sentiments and embellishments to personalise.

Share your stencilled silhouettes with us on social media! Tag us on Facebook, Instagram, LinkedIn, or TikTok or use the hashtag #crafterscompanion on your post.